Tank Removal
This is the method I used for removing the black-iron fuel tank from our 1984 Baba 40; your interior layout may be different, your tank may be installed differently than shown here. High speed cutting tools can generate sparks, heat, and smoke so take normal precautions to prevent damage and injury. This account is intended for historical purposes and is not intended as instructions for removing your tank.
Multiple tanks will replace the single tank therefore we wanted to remove the tank with minimal destruction of the existing teak floor. Any modifications to the sole required to install the new tanks will be made as part of the design of the new tanks.
There is one permanent floor support to remove as shown in Fig.1. No disruption of finished teak was required.
Tools used were a Makita Reciprocating Saw, Die-grinder, Milwaukee ½ drill motor, hole saw bigger than the saw blade, various saw blades, hacksaw, hammer, and a pry bar. I used industrial strength power tools since the tank is made from 3/16” steel. I found Milwaukee “Demolition” blades invaluable – never broke or bent one.
The tank is five inches deeper in back than it is at the forward end and will not slide forward intact. The basic idea here was to cut off the top in sections then remove the bottom half. Cutting off the top half entails cutting off as much of the accessible side as possible then reaching through to cut the other side.

Figure 1 - Single support to cut for bilge access
Starting under the large opening at the table pedestal, I cut around the tank starting with the forward access opening and cut the corners with the die grinder with 4” cut-off wheel.
I removed the forward starboard corner of the tank as shown in Fig 2. Next I cut the side as low as possible and then cut the top along the floor framing. The port side of the tank was then cut by reaching through the openings on the exposed starboard side and cutting from the inside.

Figure 2 - First cut
I cut the forward end and port side of the tank. The bulkhead forward of the tank is non-structural and was removed - I cut through both the tank and bulkhead at the same time.

Figure 3 - Forward top removed
After removing the cut sections I removed the baffle bisecting the forward tank opening. I then cut aroung the girth of the tank as far aft as possible. This freed the bottom half of the first three feet, it was removed through the opening by the table pedestal.
After removing the forward three feet, I removed the aft two feet. The supports for the drip pan at the bottom of the companionway were removed. These were screwed and glued in place, a wood chisel was enough to break the glue bond. I used a hole saw slightly larger than the saws-all blade to start the reciprocating saw.
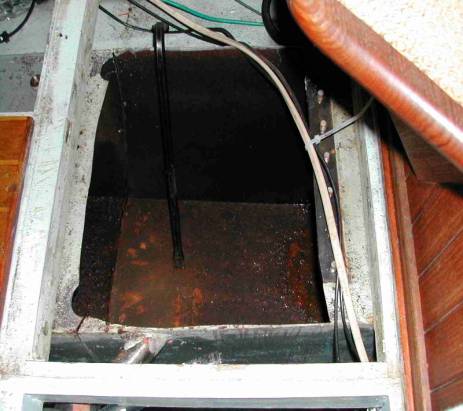
Figure 4 - First cut in the aft end of the tank
I then separated the aft part of the tank by cutting around the girth of the tank as far forward as possible. A die grinder was used to cut the lower sides and bottom. Since the aft end of the tank is tucked under framing an additional band of tank needs to be removed. Once this band is removed the aft end can be slid forward and removed. Please note we had resilient foam under our tank from a faulty refrigeration installation.
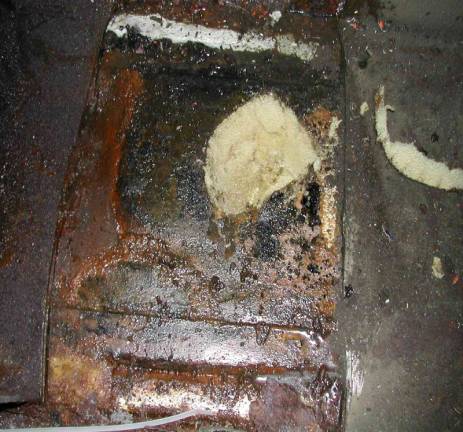
Figure 5 - Cut and remove a band of the tank
With the first three feet and the aft foot and a half removed this leaves the most inaccessible part under the settee and galley counter. There are two baffles in this section of the tank, each welded along the bottom and sides. These were removed by reaching in and cutting them with the reciprocating saw, as shown below.

Figure 6 - Baffles removed
Next I cut the starboard top corner off the remaining tank and used this opening to reach across and cut the other side. A 9” saw blade was instrumental in cutting the side low enough for access. The longer blade can be bowed while cutting, allowing a cut much lower on the side of the tank than would otherwise be possible. I clamped the top edge to the floor framing while cutting the opposite side. Angling long blades allowed a lower cut while avoiding the framing.

Figure 7 - Cut as much of the corner off as possible
The top was removed intact through the opening by the table.

Figure 8 - Just the bottom remains
Finally drag the lower piece forward into the opening, cut it in half and remove.

Figure 9 - The last bottom section, cut in half
If your tank was anything like mine, you now have a lot of scale and other debris to remove from the bilge.
Figure 10 - After a little cleanup...
The dark area on the side of the bilge is from pourable foam leaking out the bottom of the refrigerator when TaShing insulated the refrigerator compartment. The foam actually ran under the tank and finished blocking any possible drainage for the fuel tank.
That’s it. The cut-off wheels cut into the rails a little but it’s easy enough to repair and I wasn't keeping the mounting rails anyway since they were rotten. I spent a couple of weekends removing the old tank and other interference.
Back to Planning Page
Forward to Bilge Prep Page