Bilge Preparation
Additional Problems
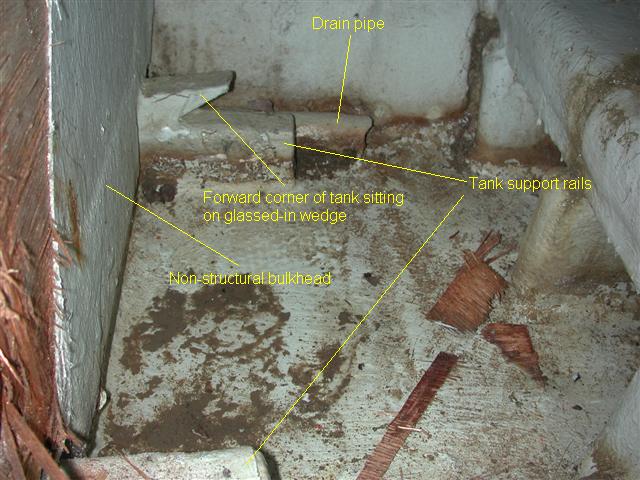
With the tank removed, the need for additional work became apparent. Hidden problems included poor fiberglass work under the tank, unevenness in the tank mounts (the forward port corner of the old tank actually rested on a wedge through the forward bulkhead to level the tank), and the non-structural bulkhead at the forward end of the tank allowed water from the mast step area to leak through. Additionally the drain pipe from the mast step area was several inches above the lowest level of the mast step.

Mast step area - note poor finish work, water level marks from poor drainage
The fit of the forward bulkhead was very poor, with as much as a two inch gap filled in by the cloth attaching it to the sides. The bottom of the bulkhead leaked water from the mast step to under the tank.

Note wedge for tank support, uneven fiberglass work allowing standing water
The bilge under the tank was very uneven, allowing many opportunities for standing water. The old tank mounts were glassed-in teak with the chain locker drain pipe outboard on the portside, the mast step drain pipe outboard on port. The fiberglass work around these pieces was fairly bad, allowing standing water against the lower sides of the tank and water intrusion into the wooden rails.

Uneven surfaces allowed water to pool around and under the old tank.
Changes made to the bilge
Tank mounts
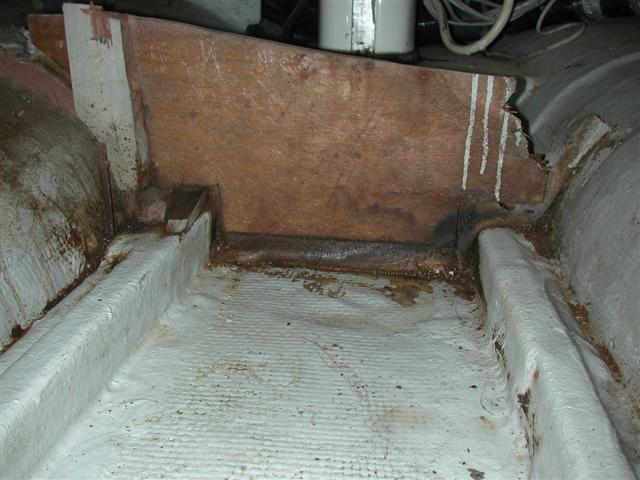
During the process of removing the old tank the mounts were damaged while cutting the tank corners. Examination of these cuts revealed widespread water intrusion between the fiberglass and the wood rails. I decided to remove the original tank mounts and replace them with plastic bar stock. During the removal process I discovered several areas of rotten wood under the fiberglass. The two drain pipes were also removed to allow more room for the new tanks. The mast step area will be allowed to drain under the new tanks, the chain locker drain will be re-routed from under the tanks. I still want the chain locker drain to run to the bilge since it occasionally carries odiferous mud and water, smells I do not want in the main cabin.
Removal of the tank mounts and pipes were accomplished with a cutting wheel on a die grinder. I cut as close as comfortable, leaving resin blobs and fiberglass behind. After a bit of experimentation I decided a hammer and wood chisel did a very good job of removing the remaining fiberglass and shattering blobs of resin. I followed this with sanding. Since this area will not see the light of day once the new tanks are installed, I did not spend the time to give it a high finish.

Bilge after removal of the mounts and drain pipes - ready for tank mockups

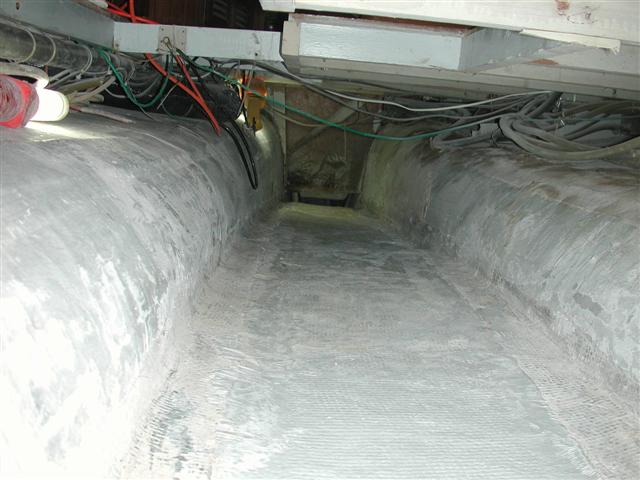
Bulkhead at forward end of tank also removed. Note the chain locker drain under the ground plane.
Forward Bulkhead
The bulkhead on the forward end of the tank was non-structural and therefore removed following the same basic steps as removing the tank mounts. The mast step area can now freely drain under the new tanks.
Water Pump Mount
The glassed-in mount for the water pump was removed from the side of the bilge. The space will probably be used by the new tanks and I'd prefer an isolation mount for the pump. It was interesting that the fiberglass pulled free from the bilge in a solid sheet, an indication that the area wasn't prepared correctly prior to fiberglassing the pump mount.
Under the tank
Levelling the area under the tank is relatively easy, but a little knowledge of fiberglass resin versus epoxy is helpful. For maximum adhesion, fiberglass resin needs a clean, paint-free fiberglass surface to bond. Fiberglass resin does not bond well to epoxy. Epoxy, on the other hand, will bond to fiberglass and paint. For non-structural work like filling low points, I used thickened epoxy after abrading the old surface. If I had planned any future fiberglass work on the bilge bottom I would have taken the time to completely strip the area and use fiberglass resin filler.
Back to Tank Removal Page
Forward to Tank Mockups Page


